This is my first try to built a home automation system using Raspberry Pi 3. This home automation system will interface user using a magic mirror interface and another web interface.
The IoT concept is booming and expect to connect 20billion devices into internet by 2020. The opportunities are enormous in multiple layers of this development which include software, hardware, machine learning, neural networks and cloud service. As a Web Developer by profession, this is my first project in IoT domain. I Will go through the concept, design and build for this project. In total it took 10 days of my holidays to complete the project. Before getting started, let’s have a look at my work.
From Concept..
For a IoT beginner, It is good to start with basics, the Home Automation. Home automation has some specific advantages for the beginner, it is simple and allows to expand system progressively. If we are able to build a system with a module based architecture, it will allow us to enhance or add new components over time. Home automation systems basically include control of basic appliances, intelligent decision making, enhanced human interaction, remote control and reporting.
Back to reality, we have to implement a system which is connected to internet, which will be able to make device control from anywhere. Systems can include basics like switch on/off for appliances and complex systems which make decisions based on machine learning(Well, i am not going that far for first attempt :)). Another important part is to interface with human, for this i have planned a Magic Mirror which will be powered by Raspberry Pi and web based interface which can be accessed from any device which has internet connectivity.
Magic mirror will be primary interface to the system, the concept is pretty straightforward. If we place a LCD monitor behind it, only the brighter side(white) can be seen in front while other areas will act like a mirror.
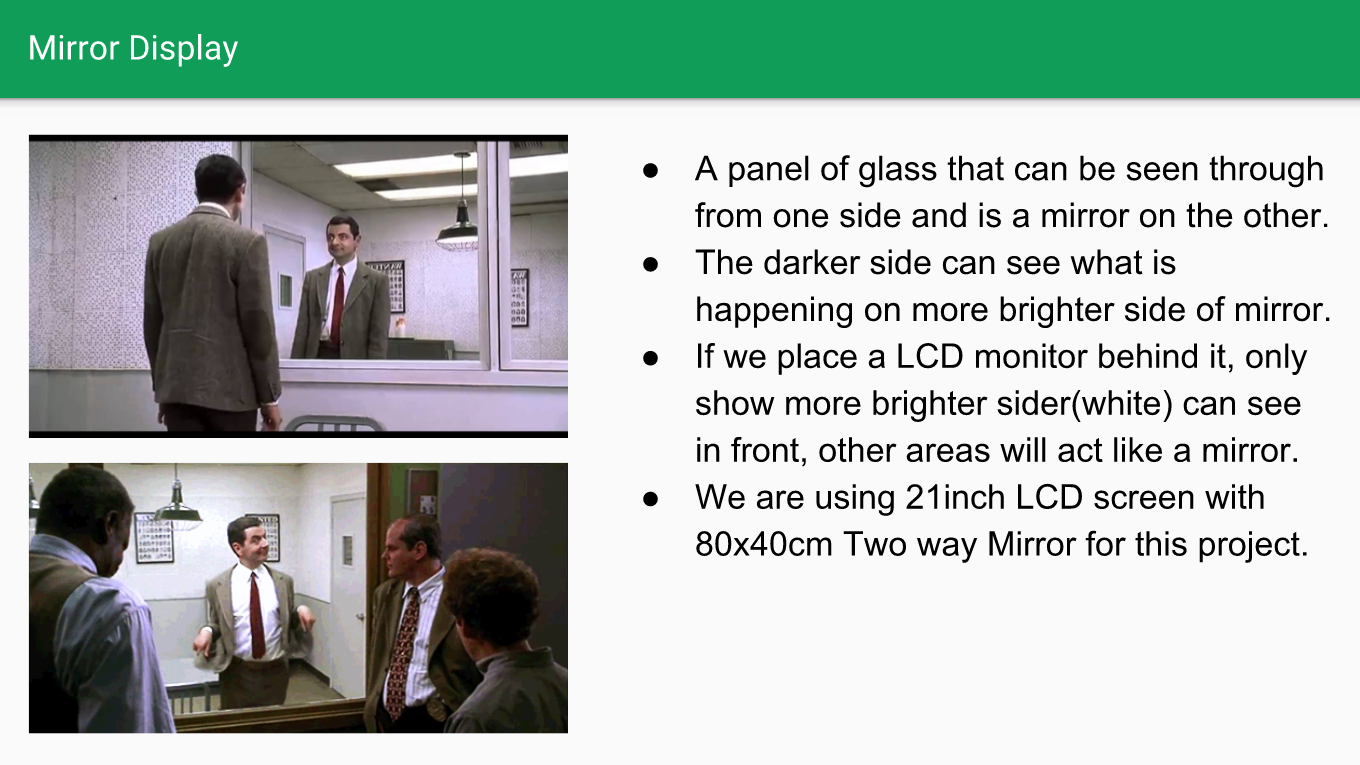
Magic Mirror Concept of transmitting light.
The main parts of the systems are,
- Server: Based on PHP Laravel based application
- Communication: Websocket
- Interface 1: Magic Mirror Raspberry Pi 3, With voice recognition
- Interface 2: Web based responsive administrative interface
- System 1: Automatic water level control
- System 2: Basic light/appliance control
- System 3: Room temperature/humidity monitoring
- System 4: LED color control
In this blog post i will be specifically focusing on Magic Mirror interface with voice recognition. I have explained other components in linked blog posts.
Design
The complete home automation system will be using module based architecture. In which Magic mirror is a module powered by raspberry Pi 3. It will use 21 inch acer lcd monitor for display. It is good to have use monitor which has LED backlit, which provide proper contrast need for magic mirror. Raspberry PI 3 will use Ubuntu Mate OS, and it will launch chromium browser on startup in fullscreen mode. Chromium will show the mirror screen, which is essentially a web page with dark background.
- Create magic mirror display using double sided mirror and LCD monitor.
- Use Raspberry PI 3 loaded with Ubuntu Mate OS as basic display.
- Connect LED Strip, Temperature humidity sensor, Relays, IR motion sensor, MicroPhone to Raspberry Pi GPIOs.
- Load mirror module page on startup of OS using chromium browser.
- Control GPIO PINs using PHP Process running in background.
- PHP Process also establishes communication to the server through websocket
The Hardware
The mirror and LED screen is hold by a wooden base. The space inside wooden base can be used to hold all electronics including raspberry pi sensor and power adapters. All the connection including power supply will be inside and should not be visible from outside. The LED strip will be placed outside the wooden base but will not be visible in front. There will be also provision for power and microphone.
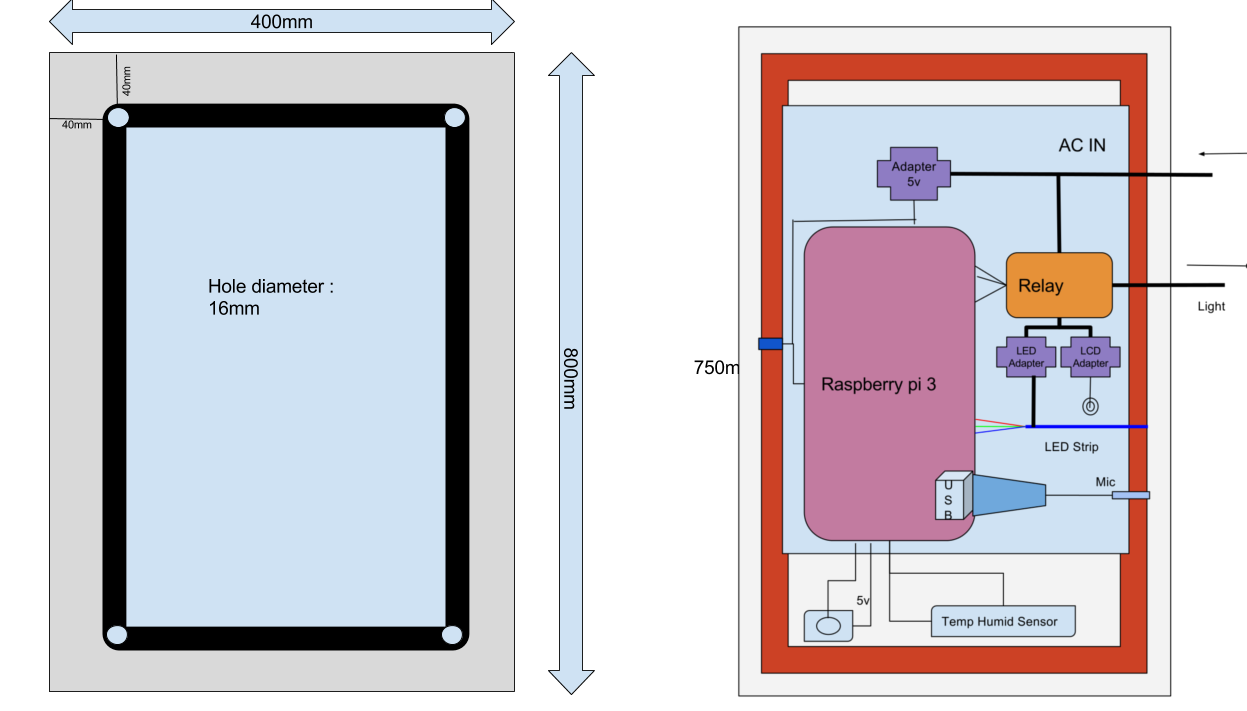
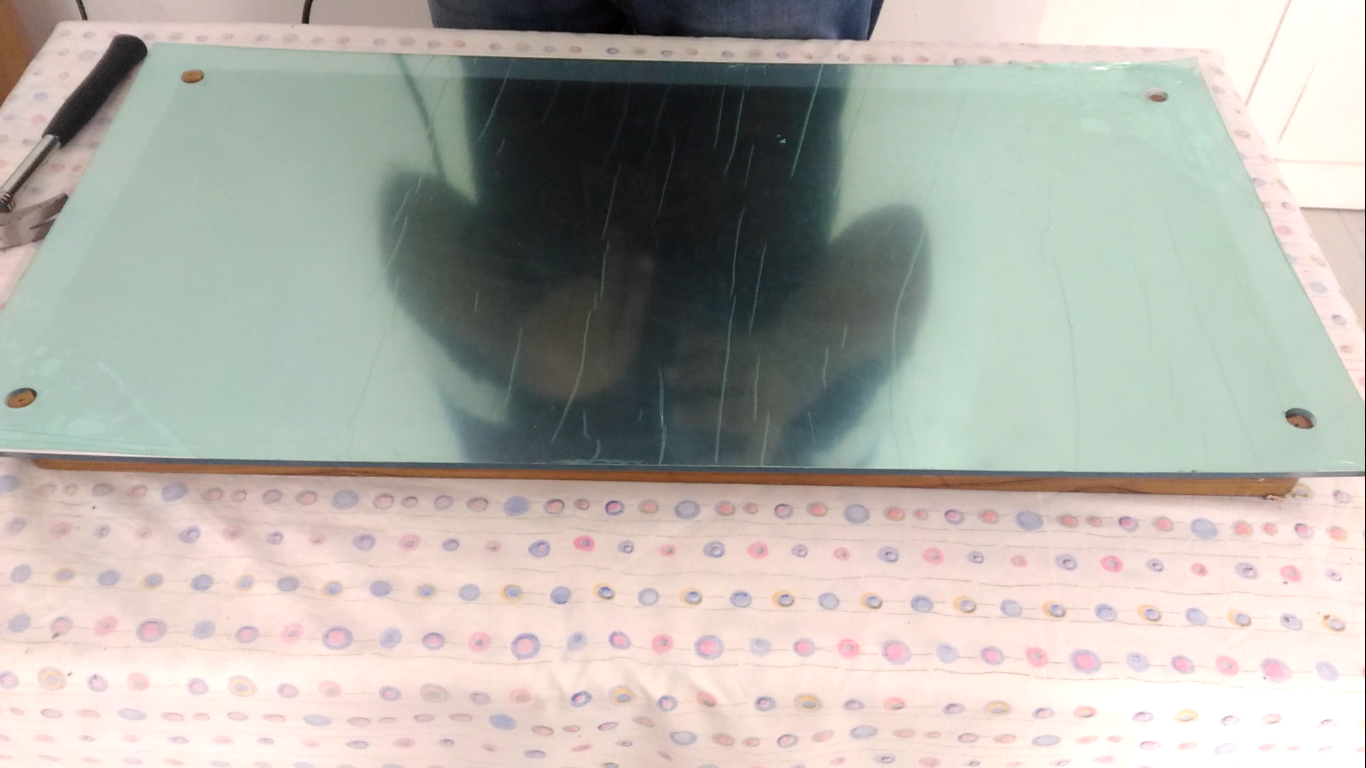
Magic Mirror wooden base and mirror
For LCD screen will use an 21 inch Acer LCD monitor with LED backlit and HDMI interface. While choosing LED screen it is important to select a monitor which has less bevel edges. The less space between screen, mirror and display will reduce light dispersion.
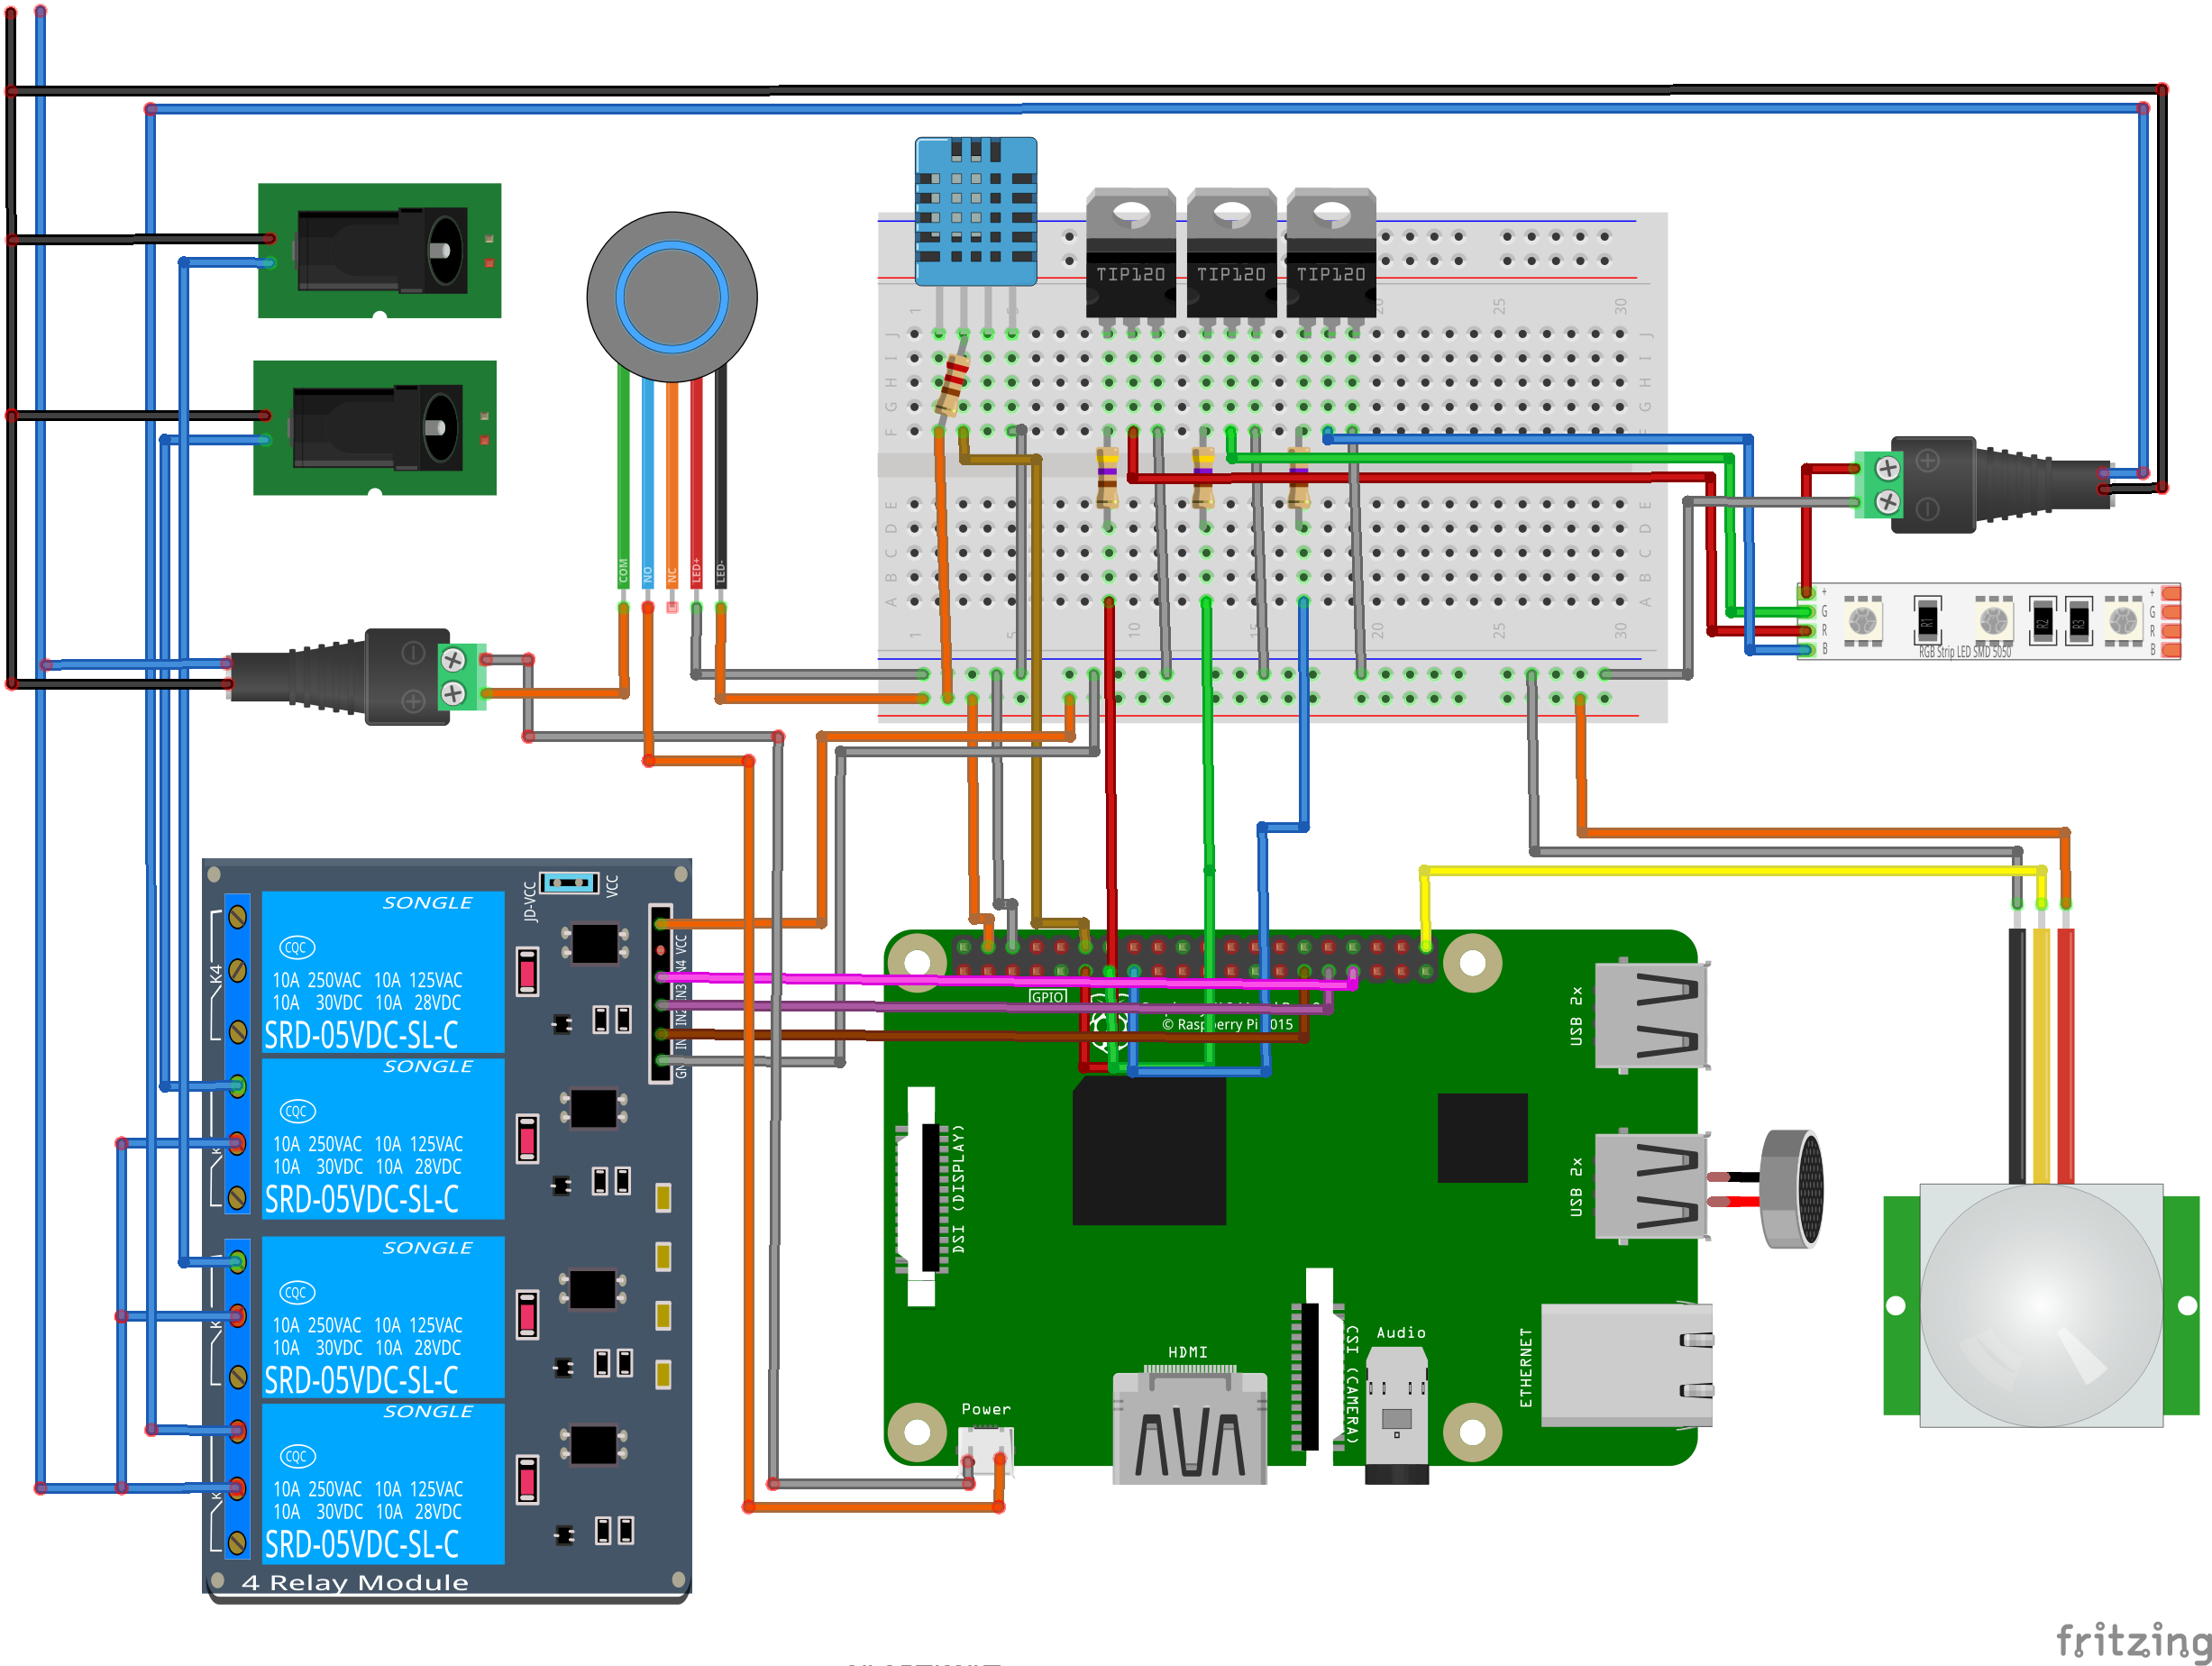
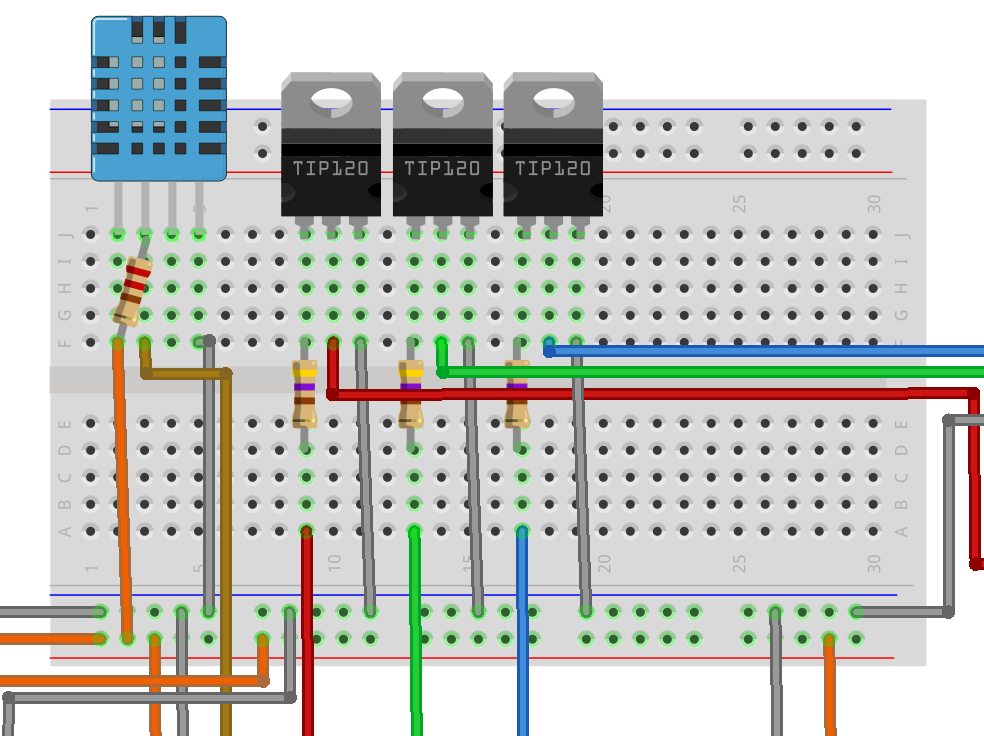
Magic Mirror module full circuit diagram
It is important to provide adequate power supply to Raspberry PI and sensor. The supply should be minimum 2A at 5V.
Magic Mirror Display Page
Magic mirror display is a webpage loaded from server and opened in kiosk mode(ie, fullscreen). We can add additional parameter to this command which will disable some chromium functionalities and increases performance.
DISPLAY=:0 chromium-browser --kiosk http://akku.net/mirror
Mirror page when opened will display blank black screen. Same time, in background it will establish a websocket connection to the server. This websocket connection will later be used to send command to server and to receive device status information from server.
When motion is detected by IR motion sensor, the mirror display comes to view. It is a simple page with 3 basic sections. Which contain weather information throughout day and week, all sensor information, Water level on water tank. Most of the modules connected can be controlled using voice commands.
Voice recognition
Simple voice recognition is implemented using Web Speech API provided by modern browsers. Please note that Web Speech API is in beginner stage of implementation and only available in browsers like chrome and chromium.
[javascript]
var recognition = new webkitSpeechRecognition();
recognition.continuous = false;
recognition.interimResults = true;
recognition.lang = ‘en-US’;
recognition.start();
recognition.onstart = function(event){
console.log(“Voice recognition started”, event);
}
// Process parsed result
recognition.onresult = function(event){
console.log(“Voice recognised”, event);
}
[/javascript]
These few lines of code is enough to get started with WebSpeech API. We can configure this api to provide constant results or as full sentence. if recognition.continuous is true then onresult function will be called only when browser think voice command input is completed. There is also a chance to trigger onresult function multiple times, even input is done only one time. The code should handle these scenarios.
Mirror screen URL should be HTTPS, other wise browser will always ask for permission every time it starts
Left section have current date and time followed by upcoming holidays. After holidays we show widget from auto water level maintenance system. This section will show current water level, cutoff and trigger limits. There is an indication of last updated at time which shows when the last update was made. When motor is activated(turned on) it will also show the rotating icon. There is also a graph which shows the water level changes. All the water level information will be shown in percentages since it is easy to recognize.
There is also an indication of room temperatures and humidity given by DHT11 temperature humidity sensor.
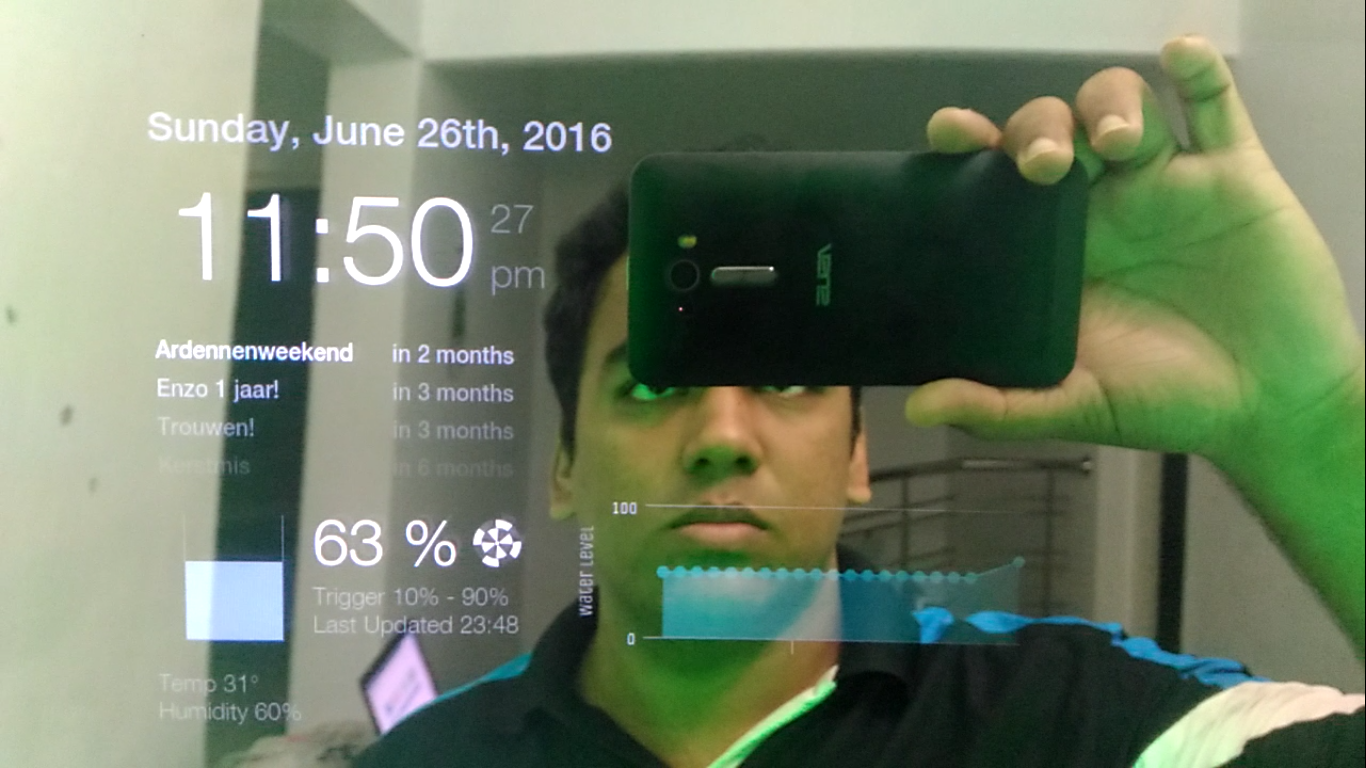
Magic Mirror Left Top section with date time, holidays and humidity temprature
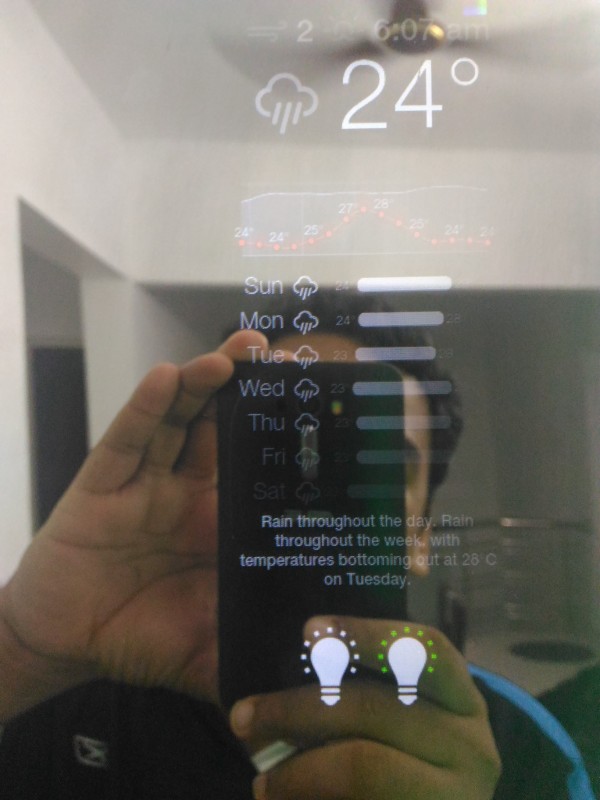
Magic mirror daily weather and light status display
Right side of mirror screen mainly include current time and weather information. Weather information is shown as daily and weekly basis. All the weather information is getting from Dark Sky API. Dark Sky api is free for limited use. The weather information is followed by suggestions.
Next section shows both room light status and LED backlit status. When it is switched off the icon will be greyed out. Once light comes on, the icon will turn white. LED backlit will also show the color the backlit it turned on.
For base structure of mirror page i have forked jangellx/MagicMirror repo, which was highly helpful, Hatts Off jangellx
Apart from these two sections, we will also show notification messages and news updates on middle section. This section also used to display actions once it is recognized from voice input.
Planning
Once design phase is completed, it is time to create a proper plan for execution. Lot of new features which need to be implemented is completely new for me and need some TD(Technology Demonstration :)). So i have decided to do TD for each of the following challenges before the real execution of project can happen. Since i am an SE i am confident about server section. Most of the TDs are related to electronics and hardware.
- WebSocket communication using ESP8266 module (For water level sensor module & Relay module)
- Proper wooden holder for Monitor, Mirror and electronics
- RGB LED strip control by Raspberry Pi
- Solar+LiPO based Adequate power supply for water level sensor module
- Power supply for Raspberry Pi, Relays and sensors
- Ultrasonic module distance measurement and noice rejection
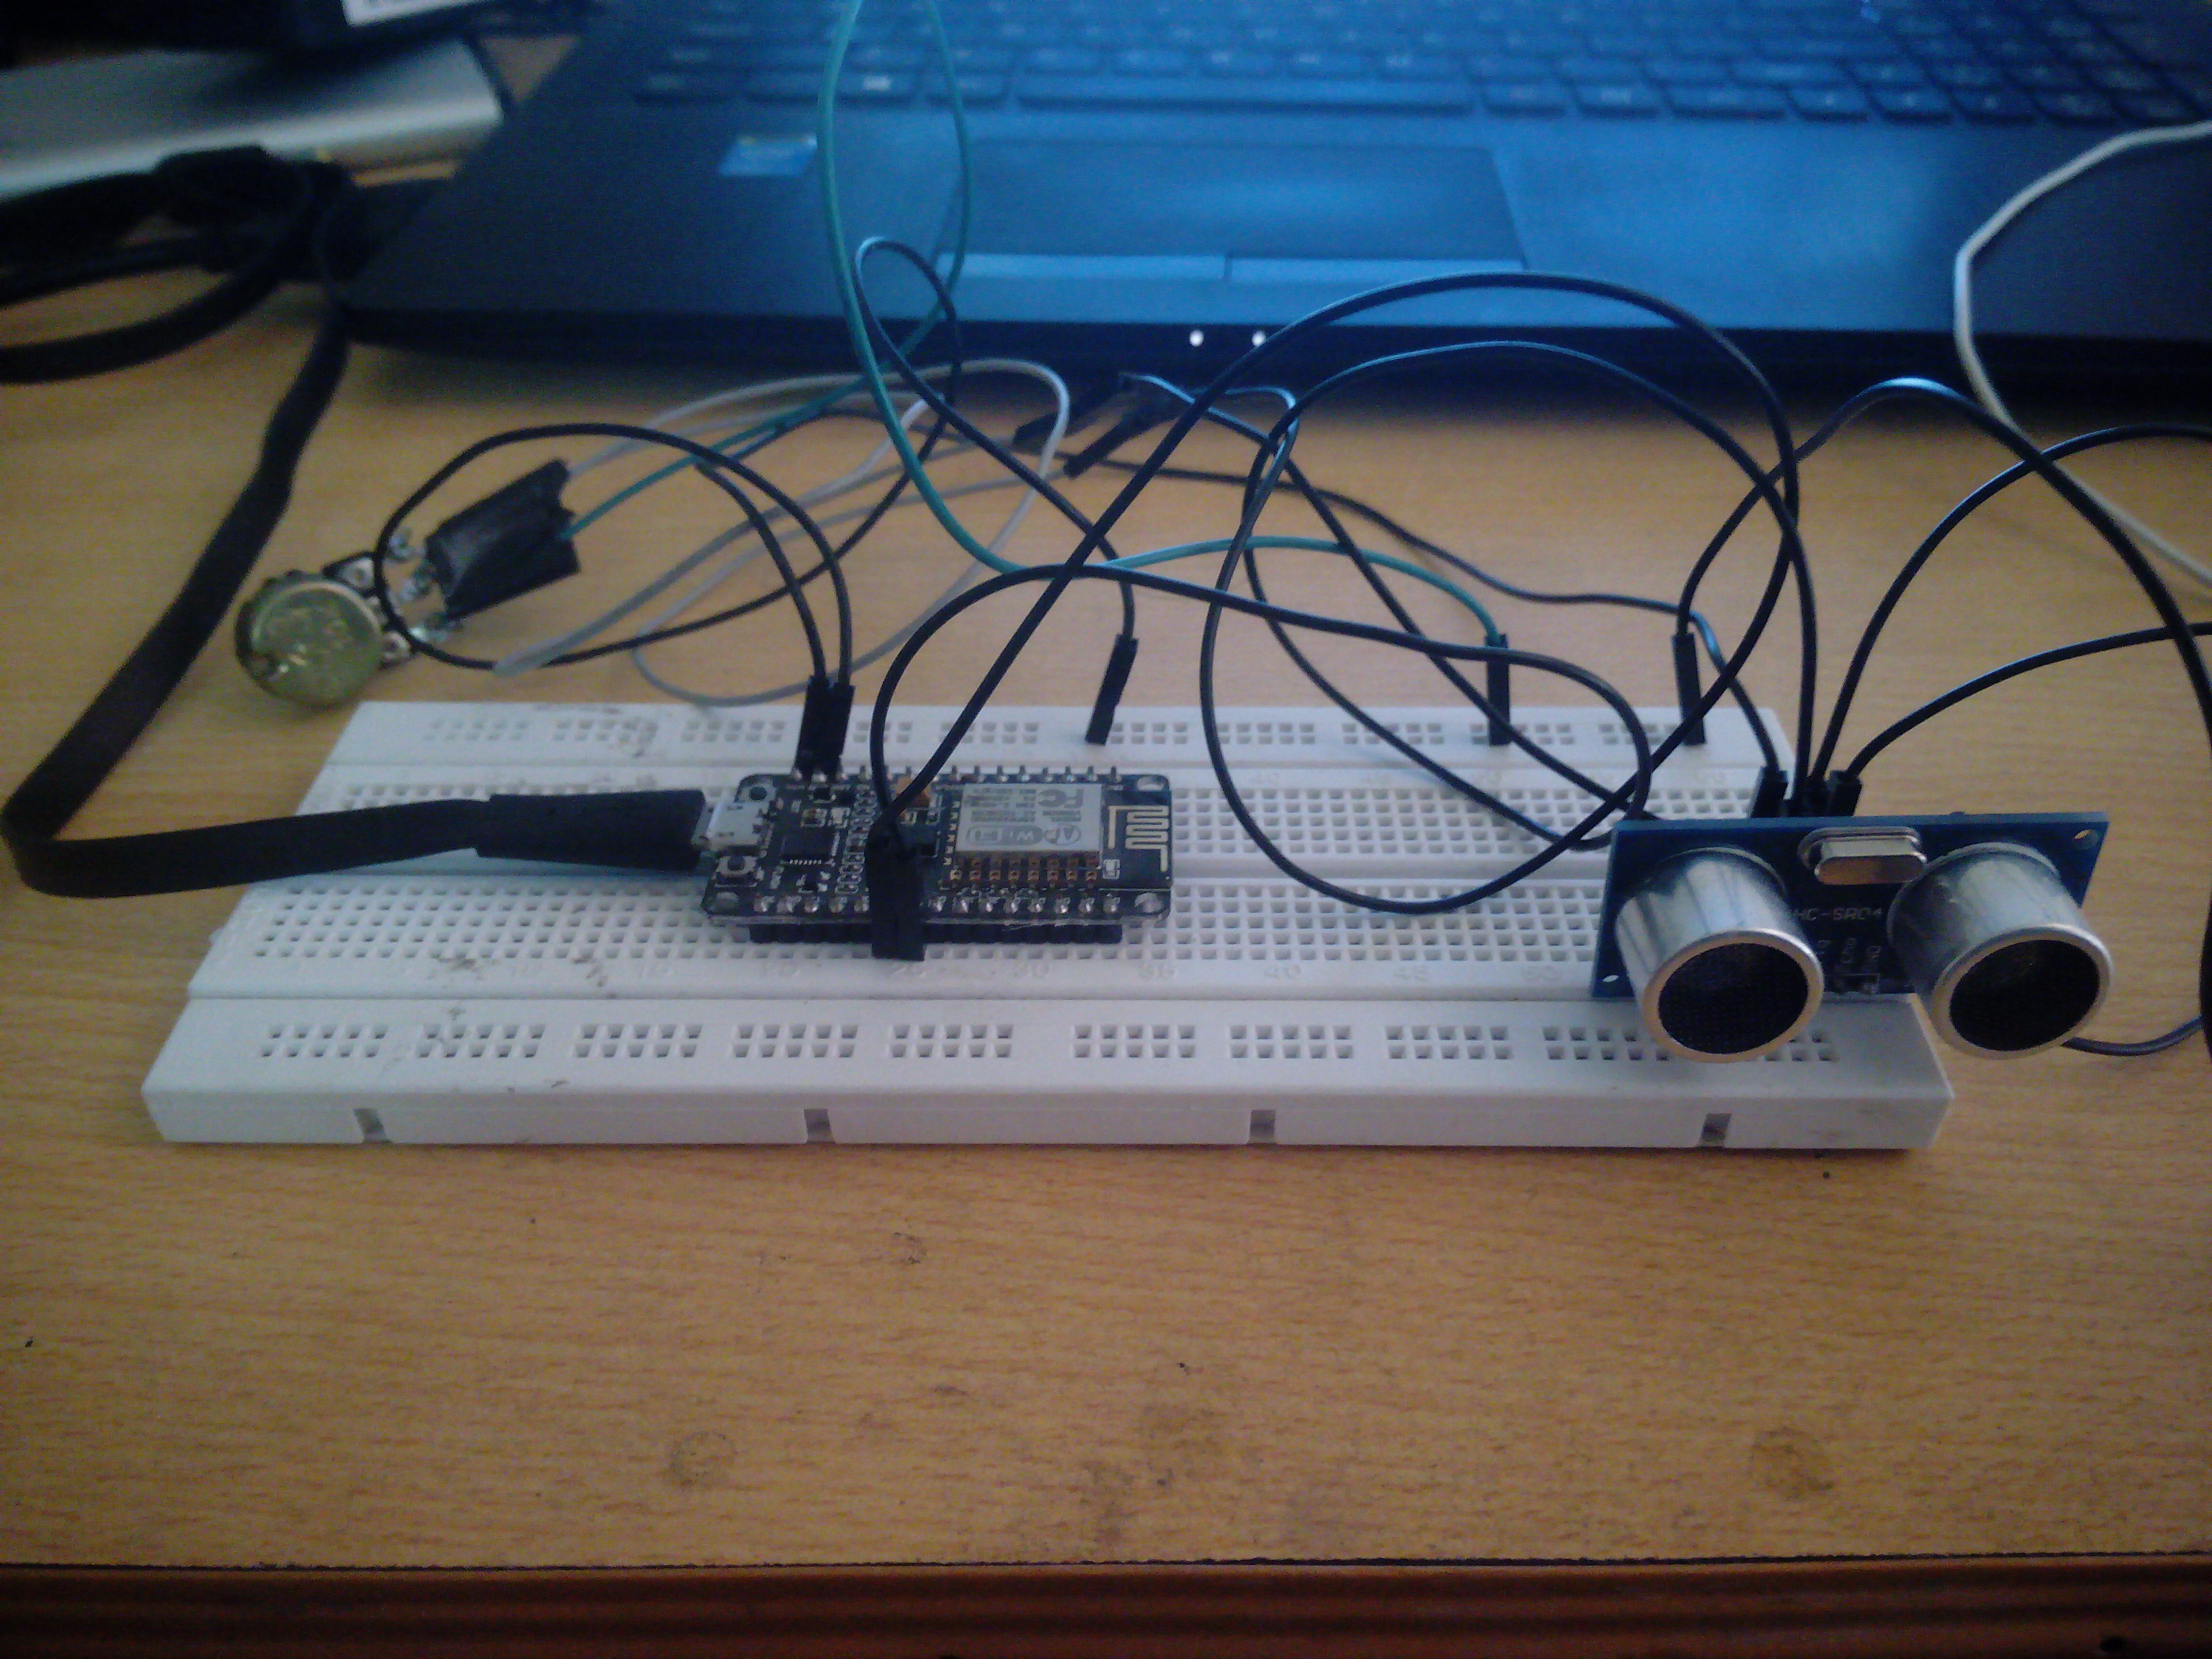
Ultrasonic module TD
For the server side i have used one Linode VPS which is already available. Websocket server and admin interface will be on same instance. The order for Double sided acrylic mirror sheet with holes and wooden base is made as designed. The mirror will have 800*400 mm dimension with a thickness of 5mm.
Once all of these challenges were done and dusted, i have exactly 10 days(+2 days of buffer :)) of my holidays to convert concept into reality. Luckily, 5 days before my holidays started, hardware which i ordered from AliExpress started arriving. Next is the planning for 10 days for the perfect execution of the project.

Magic Mirror Notes
| 5700 Lines of code |
15000 Total Cost |
120 Hours Worked |
120 Components Used |
135 Solder Joints |
16 Sheets of Paper |
Execution
As per the plan the whole project will complete in 10 days. The components ordered were already delivered on time. Also i have made custom order for Wooden base and Double sided mirror. I Will be using LCD which i already owned.
Components
| Item | Item | Qty | Price |
|---|---|---|---|
 |
Raspberry pi 3 | 1 | US $39.88 |
 |
5V 4-Channel Relay Board(Active Low) | 1 | US $1.99 |
 |
HC-SR501 IR Pyroelectric Infrared PIR Motion Sensor | 1 | US $0.73 |
 |
DHT11 Digital Temperature and Humidity Sensor | 1 | US $1.50 |
 |
USB Sound Card | 1 | US $0.99 |
 |
2.5M 5050 RGB LED Strip | 1 | US $4.50 |
 |
Universal board Experimental PCB | 1 | US $0.20 |
 |
Jumper wires (Mix) | 30 | US $0.90 |
 |
TIP120 darlington transistor | 3 | US $0.40 |
 |
Resistor 470 Ohm | 5 | US $0.05 |
 |
230V AC - 12VDC 1A Adapter | 1 | US $1.15 |
 |
230V AC - 5VDC 2A Adapter | 1 | US $3.21 |
 |
12V Push Button | 1 | US $2.75 |
 |
0.5M HDMI Cable | 1 | US $0.62 |
 |
Mirror Screws | 4 | US $0.5 |
 |
Wooden Base | 1 | US $20.00 |
 |
21 Inch LCD Monitor | 1 | US $80.00 |
 |
DoubleSided mirror | 1 | US $25.00 |
The total cost of the components for magicc mirror module is around $185(₨ 12,000). Which is including the price for LCD monitor.
Built details
The wooden base i have ordered was delivered within 3 days. Extra holes required for Power in, LED Strip, microphone, and Power on switch has been drilled. After that the whole exterior of the wooden base is polished to get a shiny look.
The wooden base have slot to fit electronics and LCD monitor. For added strength a double sided tape is used to stick LCD into the wooden base. The bevel edges of LCD monitor has been covered with tape to make sure the the background of the mirror is as dark as possible. After adding LCD, double sided mirror is placed over it and screwed using mirror screw, which give a nice look in front. LCD monitor is configured to use maximum contrast setting which increased brightness levels as required.After adding mirror onto the wooden base it is good to cover the whole back side of the mirror with dark tape. no light from LED backlit should get into mirror, once that is done. After that power button is placed on hole which is already made and 5050 RGB Led strip is placed over it.
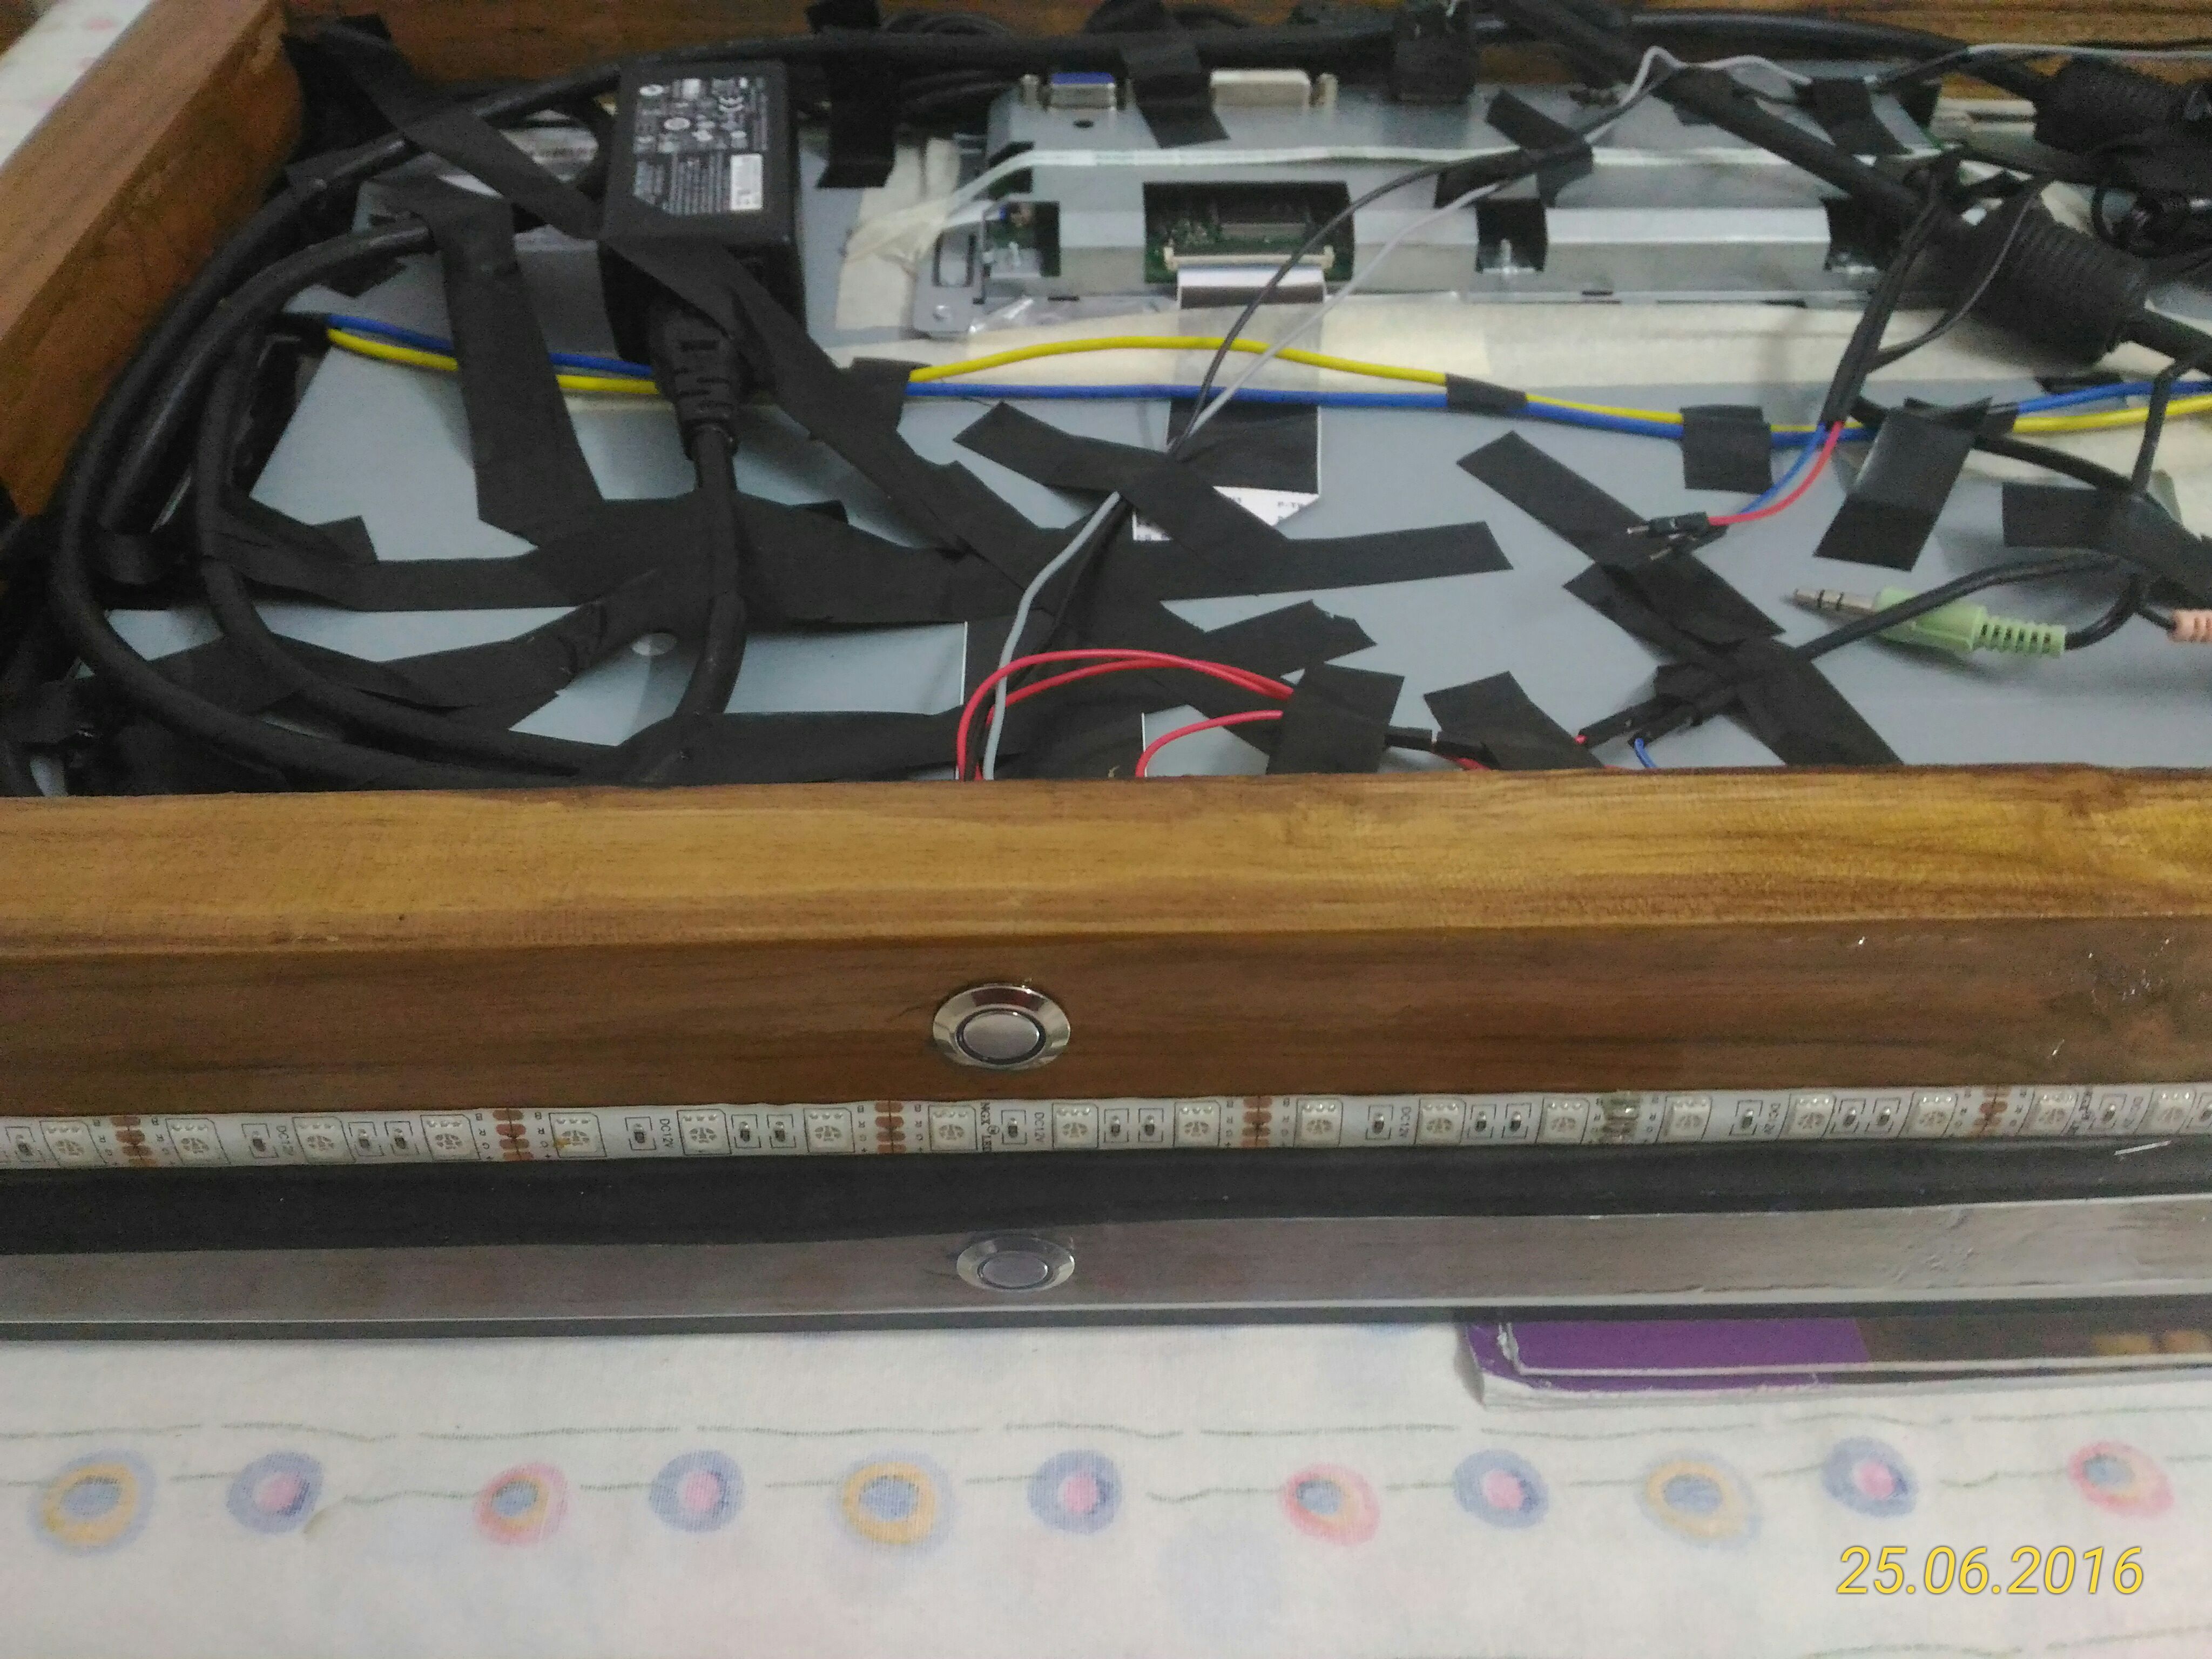
Power button and LED strip placed on Wooden base
Follwing is a built video for magic mirror, for other systems like water level module, relay module i have posted separate videos on TechZoneMind YouTube channel.
Next we need to install Ubuntu Mate OS on Raspberry Pi 3. I have used Samsung Evo+ 32GB Class 10 micro SDHC memory card to get maximum performance as possible(PS. here maximum speed bottleneck is raspberry pi). After loading the OS, chromium and Backend PHP script is configured. SSH is configured for remote debugging. The command to start backend php script and chromium browser is added as startup commands. Once chromium browser is launched, it will register itself to the server. which send command to backend php script to turn on power supply for LCD monitor. By using this we can hide bootup screens from end user.
Mirror Module PCB
[URIS id=506]
Special Thanks
I like to thank a lot of people for making this work a success. From the start, youtube channels by Julian Ilett and Andreas Spiess help me understand the basics of electronics. I would also like to appreciate the help by my relatives & friends during the build. While coding, lot of git repos is highly helpful like MirrorModule page by jangellx. Special thanks to my colleagues who helped me to present tech session at Compassites.
Learn, Create, Share & Repeat
Thanks for reading my lengthy post. Hope this post is helpful for you in making you more aware of the possibilities of IoT. As a Web Developer by profession, i am new to IoT and electronics. Please leave your thoughts,suggestions or any mistakes you found. If you find this useful please feel free to share it.
Thanks.